|
9/29/2016 0 Comments Looking GlassThis sweet little journal came out of a page that was a free giveaway. I started with the base of the page and then began adding color, dimension, and doodles to it. On one page I wanted to add words. What came to mind were the beginning lines from The Jabberwocky -- 'Twas brillig and the slithy toves, did gyre and gimble in the wabe. I liked the way that it came out so much I continued adding more words from the poem. But I decided that I wanted to make it semi-illegible. Not sure why, but I think it's much more fun that way. And I had a great time adding colors, bits and pieces of paper, and in general turning this into a super cute mini album. I love having all the tags in it and that extra space to journal or add bits of ephemera and memory things.
0 Comments
9/25/2016 0 Comments Love your everyday lifeSometimes I see an element and I need to build something around it. For me that usually means a journal, an ATC, or a piece of stationery. I'm finding that I love working with these smaller projects in part because it's not as overwhelming as working on large scale pages. I can focus on smaller pieces at a time and have fun shuffling through my scraps and bits to come up with something that I like. For this particular journal it was finding this phrase in a magazine. I knew I wanted to do something with it and decided that a quick and easy journal sounded good. Folding a single 12" x 12" page to make this four section journal, I left two top tabs open for tags. Rather than putting in a lot of embellishments I decided to pull some fun pages together, just simple embellishments on each one, a tab to identify each page spread, and a pretty ribbon to tie it all together. My thinking is that it will be great for writing in or even for glueing down photos, mementoes, or ephemera of some sort. It was fairly quick and easy to make and I like the simplicity of it. I also love the theme of that quote right on the front cover. p.s. not sure why these pictures insist on coming through sideways but at least this way you can see the full two page spread 9/19/2016 0 Comments Mini journal of dreamsI had some spare cardboard lying around. Who am I kidding? I seem to have a lot of it, especially in that juicy stage when you've picked off part of the smooth cover and the corrugation shows through. This was a little piece just begging to be used. I decided that I wanted to make a journal using art paper instead of the copy paper that I tend to go for. I'll be honest and confess that I like using copy paper more because (a) it's less expensive, and (b) I don't feel so bad if I don't like what I've created and I trash it. However I knew I wanted to try to do something with my new small pack of acrylic paints and the copy paper doesn't always hold up well to that. So I cut the art paper into four strips, folded the strips, glued it together and then glued it into the cardboard making a sweet little book. It sat on my desk for a few weeks. I have white paper block. I love the idea of trashing it and getting all creative, but getting started, especially with one that I've made myself, isn't always easy if I don't have an inspiration in mind when I start. The inspiration for this was just to make the little book, I didn't know what I was going to do beyond that. Then I received a gift in the mail. Some book pages that had been painted. They were all sorts of yummy colors. Certain words jumped out (probably because you look at things differently when there's color involved). And then I got the idea to cut apart of the pages and make quotes and start playing on the pages. I laid down a base of colors - acrylic and my very favorite almost-dead-markers. Then I added some other elements/embellishments/scrappy bits. This was then followed by snipping and clipping words and rearranging them. I kept wanting to do rainbows of words on pages but somehow for this project the words wanted to all stay together. After they were all glued down I doodled a bit, decorated the front and back cover and now it's the cutest little thing you've ever seen. In hindsight I've realized it might have been fun to take pictures of the process so that I could document them here. But the truth is that when I'm working on this stuff I'm having too much fun and am so involved that I wouldn't want to stop and take pictures. And even though this little journal took days to make when I walked away from my art table at the end of the day it was because it was way too late and I was ready for bed. Picture taking was not anywhere on my mind. At least not till it was all over and this cute little book was done. 7/8/2016 0 Comments doodles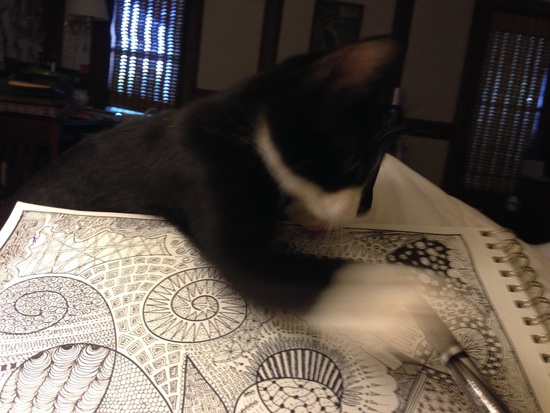 I like to knit and crochet (although lately I've not done much in the way of needle arts given my current obsession with paper, ink, collage, and glue). When doing any form of art that involves yarn or thread it can be challenging to create if there is a cat in the house.
I've discovered that the same is true when trying to doodle with a kitten anywhere nearby. This little guy was named Frankie. We found him by the side of the road and took him home. Sadly he didn't live with us for very long but while he lived with us he thought it was great fun to chase my pen when I was trying to doodle. Needless to say there were some...interesting doodle marks on my sketch pads. 7/8/2016 0 Comments note cards and envelopesI enjoy the thrill of the hunt when it comes to finding art supplies. Some things are recycled which is pretty fabulous. Others are found in the discount bin. I really like the idea that somehow they're no longer offered for regular sale and yet I'm saving them from an unknown fate. That was the case with these cards. Stationary cards that look like tags.
It was a lot of un to go through all of my scraps and come up with a fun assortment of images to put together for each card. At first I was going to coordinate them, making them different but related. Then I decided that since you usually only send one card and envelope to someone at a time it would be more fun to make them each different. I collaged each card and then decorated the envelopes to coordinate with it's card. Such a nice mom, I even added the postage to the envelopes so the cards are completely finished and ready to go. I think the one with the flamingo is my favorite. But maybe that's just because I really love the color green. 7/6/2016 0 Comments one page doodle journalThis sweet little one page journal (also made from a 12" x 12" piece of cardstock) was so much fun to put together. I love using stamps in my art and especially love when I can get my hands on large stamps from other countries. This one from Czechoslovakia is really lovely. I like the juxtaposition of the map on the cardstock behind it because I know it had to go from Czechoslovakia to Denmark on the outside of an envelope to get to the person to sent it to me inside the envelope. It's been a traveling stamp for sure.
I also like using washi tape for the spines on these little journals. I think I may have to double spine though as it may be better to use a piece of cardstock to make a thicker spine and then use the washi for decoration. On on the inside of the journal I used my very favorite almost dead markers to color in [note to self: start coloring before glueing the page edges together] the white undecorated side of the paper. I wanted to give it a little more of a decorative feel so I doodled around the tags which was a lot of fun. I love the effect of the doodle edge and the almost dead marker effect in the middle. It reminds me of clouds seen through a window. The little Beefeater came off a fun card that I had. I just love that he's tucked into a tea bag envelope. I also love that the tea bag envelope gives an extra little pocket. I seem to have a fondness for using (and collecting) them. Especially when it's an interesting one. While I could make them out of paper (really it's just a tiny pocket, folded and glued) somehow it's more fun to incorporate one that's already been used. I've been playing with 12" x 12" cardstock. Using it as a basis to make these cute little pocket journals. If you're looking for instructions on how to score, fold, and cut your paper to make one of these journals there's a good video on YouTube.
One of the really neat things that I've learned in this process is that when you start with a square piece of paper you get a journal that is rectangular. If you start with a rectangular piece (say 8 1/2" x 11") the end result is a square pocket journal. Of course if you've got pockets you need to have something to put in them. So I've been finding all sorts of yummy paper goodness to use for tags or journal cards. In this case it's vintage postcards which are just super cute. I've manage to acquire a large number of 12" x 12" cardstock from someone who was cleaning out their stash. It's only printed on one side which is kind of cool in a way because it allows me to stamp, doodle, color, or do any number of things to decorate it. Then I decorate the tags and have a sweet journal that's highly portable and so fun to use! 7/4/2016 0 Comments bookmarksI had a bunch of leftover pieces of manilla folder. It's one of my favorite journal cover supplies but when I start cutting and trimming there can be rather large bits left over. I realized that these leftover bits looked like they were the correct size for bookmarks. Grabbing some vintage (i.e., old and yellowed) book pages I glue-ripped them to the manilla.
After the glue was dry and the edges were the way I wanted them I gessoed over the pages so soften the effect. I love the fact that book pages were used to make bookmarks but I didn't want the words on the pages to distract from the rest of what I wanted to do. Then using my absolutely favorite art supply ever -- almost dead Marvyy Uchida Brush Markers (really -- I'm in love with these markers. But only when they are about 1/2 full of ink) -- I scrungied [technical term] the edges. Then I began to collage, doodle, and put down quotes. The quotes were a lot of fun and I had a hard time picking out just eight of them. I may have to make more bookmarks so I can use more quotes. [side note: I've realized I need better lettering markers. I'm okay with the scratchy font I put down but the pen I used was not so great] Coated in two thin coats of varnish and these are done. Funny enough they are almost gone. Everyone I show them to wants one so I only have three left. Quick, easy, and fun, I think I'm definitely going to have to make more. 7/4/2016 0 Comments micro mini journalsThe cover for this micro mini album is made from a vintage playing card. Stitched together with an assortment of papers it's just adorable. And I love using decorative mini binder clips as the closure.
This style of journal is a great way to keep thoughts, favorite quotes, or even mini photos. One of my favorite uses for these is writing letters. Because it's so small it's pretty easy to fill and people love getting them. 7/4/2016 0 Comments durango art journeyI've been playing with the idea of making journal blanks and then using them for documenting special moments or events. Previously when I went somewhere I would wind up with a journal of notes and observations plus a collection of souvenir papers. Putting the two together, keeping them together, sometimes proved difficult.
I saw this idea in a YouTube channel and decided that it looked like fun. Putting together an interesting assortment of papers and then taking that blank on the road proved to be a lot of fun. And somehow I managed to come home with more supplies in my art bag than I left with. Can't wait to make more of these. |
Archives
May 2018
Categories |
 RSS Feed
